Deploy Wordpress website on AWS

Over 30% of all websites use WordPress as their content management system (CMS). It is often used to run blogs, but it can also be used to run e-commerce sites, message boards, and many other famous things. In this blog, I will show you how to set up a WordPress blog site.
Before getting ahead, let us know why we need to use RDS:
Database maintenance for your WordPress site is critical. Your database instance holds all of your important data for your WordPress site. If the database goes down, your website may go down with it, and you could even lose your data.
Database maintenance can also be difficult, and database administrators have years of specialized experience. When setting up a WordPress site, you want to stay focused on designing your page and generating your content, not worrying about database performance and backups.
Amazon RDS for MySQL helps with both of these problems. Amazon RDS for MySQL is a managed database offering from AWS. With Amazon RDS for MySQL, you get:
Automated backup and recovery so that you won’t lose data in the event of an accident
Regular updates and patches, keeping your database secure and performant
Easy installation with smart default parameters.
Let’s start the project now.
We can divide this project into seven sections, for us to make it easy to understand:
Step 1: 🚀 Launch an Amazon EC2 Instance
Step 2: 🛠️ Set Up an Amazon RDS for MySQL Database
Step 3: 🔐 Create an IAM Role for EC2 with RDS Full Access
Step 4: 🔄 Connect EC2 to RDS Using MySQL Client
Step 5: 🌐 WordPress DB Creation and Apache Server Installation
Step 6: 📝 Set up the server and post your new WordPress app.
Step 7: 🌐 Explore the Newly Set Website and Clean Up.
_________________________________________________________________________________________
so we have cover the basic configuration in the yesterday blog in day 44 here is the link , we have covered till step 4 there.... LINK
but here are soon configurations you need to remember
make port 3306 available in ec2 instance for mySQL
give RDSfullAccess to the IAM role .
so here we are starting with the
Step 5: 🌐 WordPress DB Creation and Apache Server Installation
- Create a database user for the WordPress application and give the user permission to access the WordPress database.

    CREATE DATABASE wordpress;
    CREATE USER 'wordpress' IDENTIFIED BY 'wordpress-99';
    GRANT ALL PRIVILEGES ON wordpress.* TO wordpress;
    FLUSH PRIVILEGES;
    Exit
2. To run WordPress, you need to run a web server on your EC2 instance.
To install Apache on your EC2 instance, run the following command in your terminal:
sudo apt-get install apache2

3. To start the Apache web server, run the following command in your terminal:

sudo systemctl restart apache2
4. You can see that your Apache web server is working by browsing the public-IP of your ec2 instance...

Step 6: 📝 Set up the server and post your new WordPress app.
Download and uncompressed the WordPress software by running the following commands in your terminal:
  wget https://wordpress.org/latest.tar.gz
  tar -xzf latest.tar.gz

Change the directory to the WordPress directory and create a copy of the default config file using the following commands

Now create a copy of the config file and edit the wp-config.php file
  sudo cp wp-config-sample.php wp-config.php
#login as root user and  first make file writable
  sudo vim wp-config.php
Edit the database configuration by changing the following lines:
Authentication Unique Keys and Salts:
You can generate the content of this section from this link: https://api.wordpress.org/secret-key/1.1/salt/.
Replace with the existing content.

Install the application dependencies you need for WordPress. In your terminal, run the following command.
sudo apt install php libapache2-mod-php php-mysql -y


Copy your WordPress application files into the /var/www/html directory used by Apache.
sudo cp -r wordpress/* /var/www/html/

Finally, restart the Apache web server
sudo systemctl restart apache2
Browse public-ipv4address/wp-admin/ you should see the WordPress welcome page.
http://Public_IPv4/wp-admin
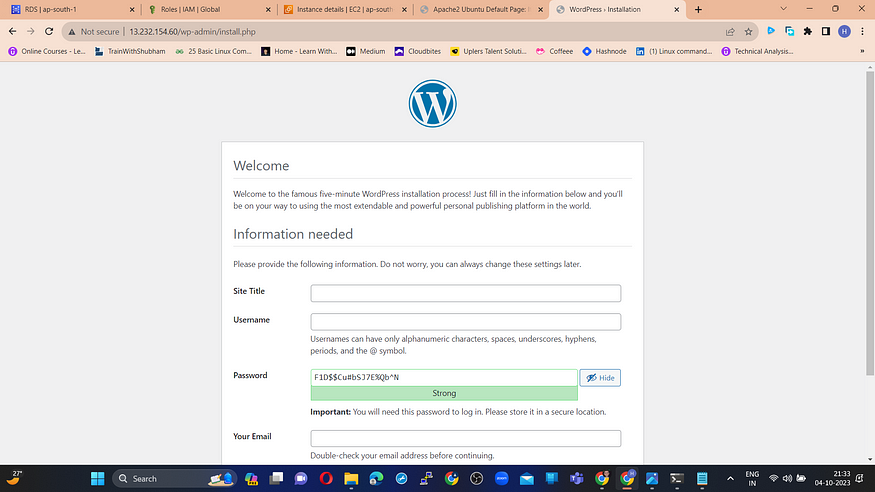

And yay! You have your own WordPress website.
Now let’s step into the final section of this Project.
Step 7 : 🌐 Explore the Newly Set Website and Clean Up
Once you have explored, we need to clean up the resources so that we can avoid being charged.
Delete your EC2 instance first and then the RDS.
wooo hooo , we successfully configured it...
If you've enjoyed this article and want to stay updated on the latest in the tech world, don't forget to connect with me on GOURAV TOONWAL . Let's keep the conversation going and explore the exciting world of technology together. Follow for more insights, discussions, and tech updates.
thanks for your support........
spreading knowledge in the community ...


